
“Why fit in when you were born to stand out?”
Dr. Zeuss Tweet
Table of Contents

Fun, Easy All About Me Craft - An Overview
I absolutely loved creating this craft with my daughters! In Ontario, we don’t start school until next month but I know that many of our American friends are already gearing up for the new school year, which is quickly approaching.
One of the things we really liked about this “All About Me Craft” was its versatility. You don’t have to wait until school reopens to complete this! You can do this at any point throughout the school year and it also makes a really cool graduation craft.
As well, this activity just isn’t for the classroom. This can be a fun DIY craft that you complete at home with your own kids. Give it a try and let me know how it goes!
Another thing I love about this “All About Me” craft is that it not only encourages self-expression but it will also help students connect with their peers and teachers. With this craft, I thought that I’d incorporate a tool that many of my students have grown fond of…Canva!
Since I’m currently teaching Special Education and ESL, I decided to complete this craft with students who will be part of my reading groups; roughly 15 students. However, this activity also works well in classrooms, but your students will need to have access to technology.
I use Canva all the time to edit photos for my blog etc. and its ease of use always impresses me. If you’ve never used Canva, or if Canva is new to your students, don’t worry! This blog post will show you how to use very basic editing features to help you create this craft. You can create this craft using the FREE version of Canva but you will need to sign up for a free account. Many of my students already have one and signing up is a very simple process.

This post may contain affiliate links and I may earn a small commission when you click on the links at no additional cost to you. As an Amazon Affiliate, I earn from qualifying purchases. You can read my full disclaimer here.
Why start the school year with an "All About Me" Craft?
I always love to start the new school year with self-reflection. During the first week of school, I talk to my students about previous school years and focus on the beauty of fresh starts. We talk about our strengths and things that we’d like to improve on.
Starting the school year with an “All About Me” activity can be really beneficial for several reasons:
- Builds Community: It helps students get to know each other and their teacher, fostering a sense of community and belonging in the classroom.
- Encourages Self-Expression: Students get the chance to share their interests, strengths, and unique traits, which can boost their confidence and make them feel valued.
- Identifies Student Interests: Teachers can learn about students’ interests and backgrounds, which can help tailor lessons to be more engaging and relevant.
- Sets a Positive Tone: It creates a positive and open environment where students feel comfortable sharing and learning about others.
- Promotes Engagement: When students feel known and understood, they are more likely to be engaged and motivated in their learning.
As mentioned previously, this craft can be completed at any point of the school year and it’s suitable for inside and outside of the classroom. Since computer access is required, this activity will probably be enjoyed the most by children who are 8 years old and up.
Here are a few other back to school activities that you’re going to love:


Our Zentangle course is here!
Are you trying to find ways to incorporate self-care and creativity into your life? Would you like to introduce the Zentangle Method to your children or students but you’re not sure how?
If you answered yes to any of these questions then you’re going to love our new course. If you haven’t had a chance yet to watch the course overview video, check it out below!
All About Me Craft - Canva Tutorial
Appropriate for Children Ages 8 and up
Difficulty: Easy
Total Time: 2 X60 minute blocks
Materials:
- Canva account
- Transparency paper
- Watercolor paint to paint the background (optional)
- Patterned paper for the background (optional)
- Cardstock
- Liquid glue/glue stick
- Printer
- Computers or access to technology

Instructions:
Step 1 – Sign Up or Log In
If students haven’t used Canva before, they can sign up for free or log in with existing accounts.
You can visit the Canva website HERE.
I’m using Canva Pro in this tutorial but you don’t need the pro version to complete this craft.
Step 2 – Start a New Project in Canva
Once you’re in Canva you can click on “Create a design” and then click on “flyer(portrait 8.5 x 11 in)”.

Step 3 - Take/Choose Your Photos
In this tutorial, I used a high resolution photograph of my daughter Chloé. In the past, when I’ve done similar activities with my students. I took the pictures of my students on my phone and then uploaded them to whatever editing tool I was using at the time.
By taking the photos myself, I was able to ensure that the images were taken in portrait orientation (shoulders up), good quality, and on a plain background.
You can have your students make a funny face or smile casually, or not smile at all; they can be as authentic as they’d like.

Step 4 – Upload a Photo
Once your students have a photo of their liking, save the photo to whatever device/computer they’ll be using for the editing. Once you create your new file in Canva, click on UPLOADS to add your photo to the blank canvas.
Please note – your photo needs to be saved to your computer in order to upload it to Canva.

Step 5 – Remove Photo Background
Canva has this really cool editing feature called background remover or “BG remover” and we’ll be using it in this next step.
To remove the background…
- Click on your image
- After you click on your image, the “Edit Image” feature will appear at the top
- Click on “BG Remover” on the left of the screen.
- Canva will work its magic and remove the background.

Step 6 - Add a Filter
We want the photos to be black and white, so once your background has been removed you can add a filter.
The filter that I added to Chloé’s photo is called “Ink”. I chose ink because it works well with darker skin tones as well.

Step 7 - Add a Shadow
The shadow feature can be found in the “Edit Image” section as well. I chose the drop shadow for Chloé’s photo.

Step 8 - Stretch the Photo
When I was happy with the look of the edited picture, I stretched it, so it would take up the majority of the space on the canvas.
I did the same thing with a photo of my other daughter Chanel.
These photos will be printed on transparency paper in a few steps.


Step 9 - Complete the Background:Background Option #1 - Word Art Background
Brainstorm words for the Background
I created word art for the background of Chloé’s picture. To do this, first I had her brainstorm 10-15 wonderful traits about herself. These words could also include her hobbies and interests. She came up with words such as creative, grateful, gymnast.
You can give your students a sentence starter such as “I am…”
If your students have a hard time generating a list of their positive traits, you can help them along! Remind them of all of the things that you admire about them.
Create a Word Art Background
To create the background, I added a new page to the Canva document that had my edited picture of Chloe.
To add a new page, just press the plus sign, located just above the edited photo on the right hand side.
To create the word art background, I added text boxes and added the words that she brainstormed to the text boxes. I only added text boxes to the perimeter of the page to ensure that her face wouldn’t be covered by the words. I also tried to use a variety of fonts and I just repeated them over and over again until the perimeter of the page was full.

Background Option #2 - Watercolor
You can paint a background using a piece of cardstock and water color paints.
You can also find a watercolor background on Cava that you can print and use as your background, but you’ll need a colored printer for that.
I found a watercolor background on Canva and added it to the background of the words we brainstormed.
I chose a background that would create a nice border around the image.

Background Option #3 - Patterned Paper
As an alternative, you can use patterned paper for your background. I used pieces of paper from my Gilded Ink set. Patterned or colored paper with a border or a lot of white space in the middle works well for this.
*Tip – You can hand write words on your patterned paper or watercolor paper as well. Simply use a sharpie marker to add positive words around the perimeter of the background paper.
*Tip – If you prefer to leave your background without words, you can have each student complete a small write up about themselves that can go under their “All About Me” craft.
You can also pair this craft with one of our other “All About Me” activities. Either one of these activities below will compliment this craft beautifully.


Here is a picture of some patterned paper from my gilded paper book. These pieces of paper would work well because most of the patterns are around the border of the page.

Step 10 - Save
Once you have your background figured out. You can save your edited image and the word art background (if you created one in Canva) as a PDF. I prefer to save them as a PDF Print file.
To save, just press “share” in the top right, then click “download”. Under file type, press PDF Print, then the download button.

Step 11 - Print your edited photo
Print the PDF page with your photo on transparency paper. I really like the transparency paper that I used because it shows you what side to print on.
*Tip – If you print on the wrong side of the transparency paper, your image will not dry, so please ensure that you follow the guidelines on the transparency paper that you purchase.
The transparency paper that I purchased was specifically for inkjet printers but there are many variations of this product, so you’ll be able to find the perfect one for your printer.
Once you print your photo on transparency paper, you can lay it on top of your patterned paper. If you created a word art background in Canva, like I did, continue to the next step.

Step 12 - Print your background
If you created a background in Canva, you can print your background word art on cardstock, so your craft is more sturdy.

Step 13 - Assemble
You can use a small drop of liquid glue in each of the 4 corners of your background. Attach your transparency paper to the background. You can also use a glue stick for this step.
You can also get beautiful results if you leave your background black and white. Try a few options and see which type of background you prefer.

Step 14 - Enjoy and display
This “All About Me” craft will create stunning results! Give it a try and see for yourself.
If you’ve tried this activity with your kids or students, please let me know! I’d love to add your creations to our gallery, so upload your photos or send them directly to me at: [email protected] Thank you!
You can also tag us if you post your masterpieces on Instagram or Facebook.
We have several other activities that you and your kids will also love:
Looking for even more cool back-to-school activities? You might be interested in our back to school games bundle. Just click HERE or on the picture below to learn more!

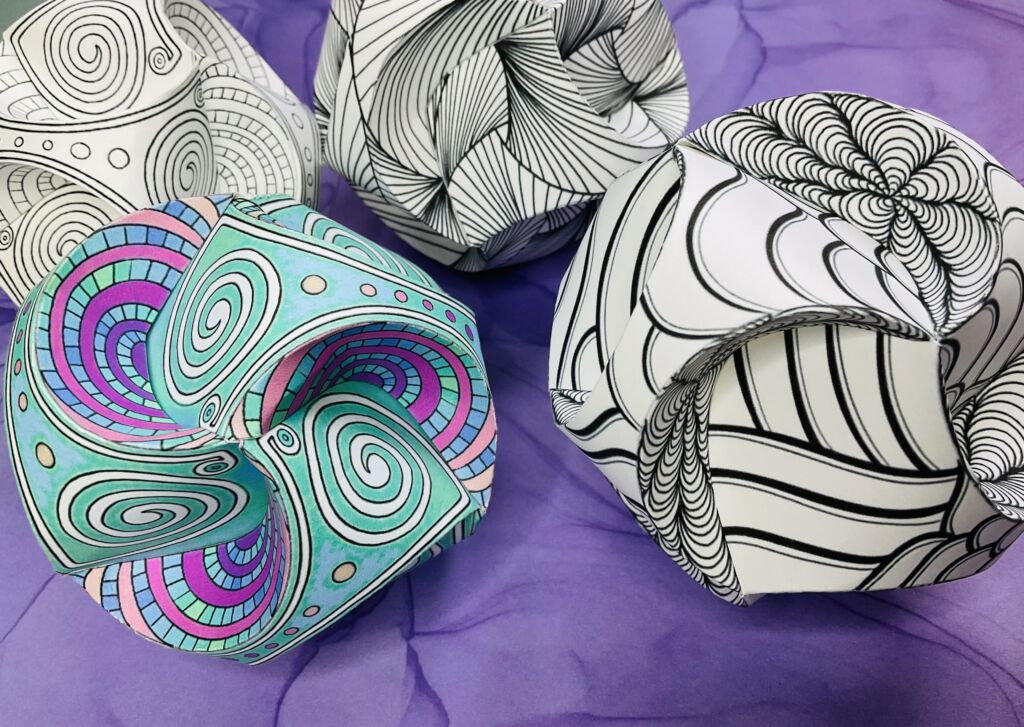
If you love Zentangle designs as much as we do, you’re going to love our Zentangle pyramid activity. Click HERE to check it out or click on the images below.

Final Thoughts
If you’re looking for more activities designed to encourage mindfulness and spark creativity, check out my printable resources below or visit my shop!


Don’t forget to download our free 15 page Mindfulness coloring book to help add a few mindful moments to your child’s day. Just click here or the image below!
