“Autumn is a second spring when every leaf is a flower.”
Albert Camus, French Philosopher Tweet
Table of Contents

Leaf Printing: A Fun and Easy Craft for All Seasons
Leaf printing is a fantastic craft that can be enjoyed by both kids and adults. It’s an easy project that requires minimal supplies, yet yields beautiful results by capturing the unique shapes and textures of leaves.
I created these leaf prints with my daughters and we were really happy with the results. We had messy fingers by the time we were finished but it was totally worth it. My students also really love leaf printing because it allows them to explore nature and express their creativity.
As well, leaf printing isn’t just for the fall! Summer and spring foliage work really well too, so try experimenting throughout different seasons and compare your results.

This post may contain affiliate links and I may earn a small commission when you click on the links at no additional cost to you. As an Amazon Affiliate, I earn from qualifying purchases. You can read my full disclaimer here.
What is Leaf Printing?
Leaf printing is a simple yet captivating craft that allows you to transfer the intricate patterns and textures of leaves onto paper, fabric, or other surfaces. It’s a fun, hands-on activity that people of all ages can enjoy, making it perfect for family gatherings, school projects, or a solo creative endeavor.
With just a few supplies, you can create unique pieces of art that celebrate the natural beauty of nature.
Here are a few other fall activities that you’re going to love:


Our Zentangle course is here!
Are you trying to find ways to incorporate self-care and creativity into your life? Would you like to introduce the Zentangle Method to your children or students but you’re not sure how?
If you answered yes to any of these questions then you’re going to love our new course. If you haven’t had a chance yet to watch the course overview video, check it out below!
How to Choose the Best Leaves for Leaf Printing
When selecting leaves for leaf printing, look for ones that have well-defined veins and textures. Freshly fallen leaves tend to work best, as they are still pliable and hold onto paint well. Experiment with different types of leaves—maple, oak, ferns, and even herbs can produce beautiful prints.
We used maple leaves and raspberry leaves for our prints. The variety of shapes and patterns will add interest and complexity to your final artwork.
*Tip – Try to avoid using dry leaves because they tend to crumble when you rub and apply pressure to them.
Leaf Printing - Step by Step Craft
Appropriate for Children Ages 4 and up
Difficulty: Easy
Total Time: 1 X60 minute block
Materials:
- Cardstock
- Paintbrushes
- Water for rinsing your brushes
- Acrylic paint (I used black, red, orange, and yellow)
- Leaves
- Scrap paper for rubbing the leaf
- Background paper for mounting your prints (optional)
- Glue for mounting your prints
- Picture frame for framing your print (optional)

Instructions:
Step 1 – Choose Your Paper Size
I used 8.5X11” cardstock paper, which is printer paper size. I was able to fit 2 leaves comfortably on the page. This paper can then be cut in half to create 2 separate prints.
Or you can print 1 leaf on each page , or many leaves on 1 page. The image below is an 8.5×11″ paper cut in half.

Step 2 – Choose and Paint the Leaf
Select a leaf and place it vein-side up on a flat surface. We chose a raspberry bush leaf for our first print. Cover your work surface if necessary.
Using a paint brush or sponge, apply a thin layer of paint to the leaf. Be sure to cover it evenly, but avoid using too much paint, as this can result in a smudged print.


Step 3 - Transfer the Leaf onto the Printing Surface
Carefully pick up the painted leaf and place it paint-side down onto your chosen printing surface (paper, fabric, etc.).
I found that picking up the leaf by the stem made it easier to transfer to the paper.
Place a piece of scrap paper on top of your leaf and rub gently but firmly with your fingers, ensuring that all parts of the leaf make contact with the surface.
You can also use the flat surface of a spoon or a brayer to apply even pressure.


Step 4 – Reveal the Print
Remove the scrap paper you put on top of your leaf and slowly lift the leaf off the surface to reveal your print. I started by lifting the stem slowly.
The intricate veins and edges of the leaf will be transferred, creating a beautiful and detailed impression. Allow the print to dry completely before handling.


Step 5 – Repeat and Experiment
Try different leaves, colors, and compositions to create a series of prints. You can layer prints on top of each other for a more complex design or keep it simple with single impressions.


Creative Ideas for Using Leaf Prints
Once you’ve mastered the basics of leaf printing, there are countless ways to use your prints:
- Wall Art: Frame your leaf prints to create a seasonal display for your home.
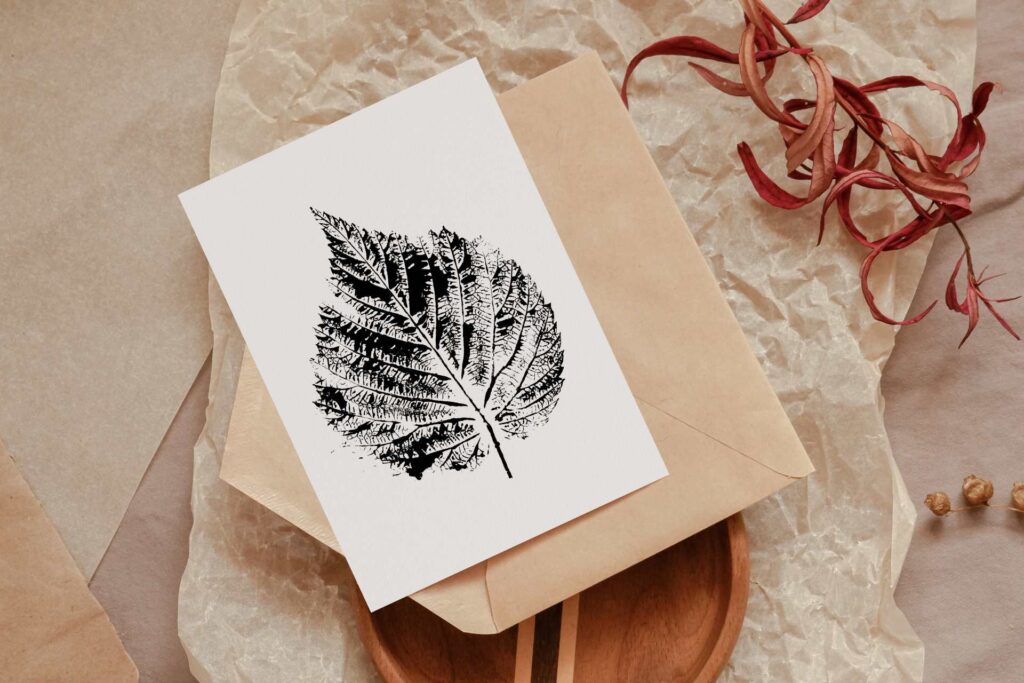
- Greeting Cards: Use smaller prints to make unique, handmade cards for friends and family.
- Gift Wrap: Print on kraft paper to create custom, eco-friendly gift wrap.
- Fabric Projects: Use fabric paint and print onto tote bags, napkins, or t-shirts for wearable art.
- Journal Covers: Decorate the covers of notebooks or journals with leaf prints for a personalized touch.


Tips for Successful Leaf printing
- Test Your Paint Consistency: The thickness of the paint can affect the clarity of your print. If the paint is too thick, dilute it slightly with water for a cleaner impression.
- Practice on Scrap Paper: Before printing on your final surface, practice on scrap paper to get a feel for the amount of paint and pressure needed.
- Mix and Match: Combine different leaves and colors to create dynamic and layered compositions.
- Experiment with Backgrounds: Try printing on different colored papers or fabrics to see how the colors interact and contrast.

Leaf printing is not just a craft; it’s a way to connect with nature and celebrate the changing seasons. As fall approaches, take some time to explore the outdoors, collect leaves, and bring a piece of the season into your home through this creative process. Whether you’re creating art for yourself or as gifts for others, leaf printing offers a beautiful and meaningful way to honor the natural world.
So, as the leaves begin to change and fall, gather your supplies and dive into the world of leaf printing. It’s a perfect activity to welcome autumn and capture the fleeting beauty of the season. Happy printing!
If you’ve tried this activity with your kids or students, please let me know! I’d love to add your creations to our gallery, so upload your photos or send them directly to me at: [email protected] Thank you!
You can also tag us if you post your masterpieces on Instagram or Facebook.
We have several other activities that you and your kids will also love:
Looking for even more cool fall activities? You might be interested in our fall games. Just click on the pictures below to learn more!


If you love Zentangle designs as much as we do, you’re going to love our Zentangle pyramid activity. Click HERE to check it out or click on the images below.

Final Thoughts
If you’re looking for more activities designed to encourage mindfulness and spark creativity, check out my printable resources below or visit my shop!


Don’t forget to download our free 15 page Mindfulness coloring book to help add a few mindful moments to your child’s day. Just click here or the image below!
