
If you’ve never seen or made a flextangle, get ready to be wowed! A flextangle is a three-dimensional paper ring, which is composed of several connected pyramids. This paper toy is extremely unique because of it’s impressive ability to be twisted upon itself repeatedly.
A flextangle, also known as a kaleidocycle, can be used as a calming tool to help children relax and be more mindful. As they gently rotate the flextangle in their hands, you can ask them to take a few deep breaths, if they are comfortable doing so, while they concentrate on the mesmerizing patterns. Most of my students who have created this paper toy have said that they’ve felt more at ease while rotating their flextangle in their hands.
Related: Blow Painting With Straws to Calm Emotions – Anxiety Art
Often, when Chloé and Chanel are twirling their flextangles, their breathing naturally slows down as they focus on the task of maintaining the flextangle’s form. Plus it’s fun! They love choosing their own patterns and unique colours when designing this incredible paper toy.
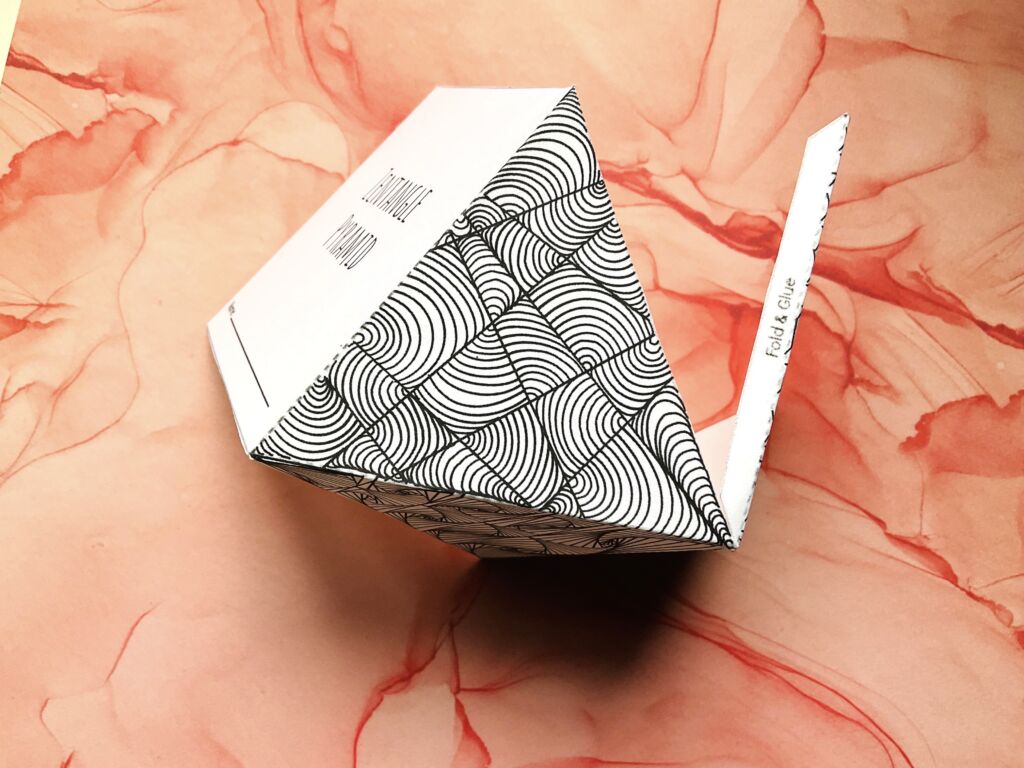
I’ve included 4 flextangle templates HERE to get you started. Two of them are covered with hand drawn patterns, created by Chanel and I, that you can colour in or leave black and white. The other 2 are blank, so you can have your children or students colour it in with their favourite colours or they can choose a colour harmony such as warm, cool, or complimentary to complete their design. You can also encourage them to incorporate zentangle patterns, which will add depth and dimension to their flextangle. Here is a picture of Chanel’s flextangle template, incorporating zentangles.
This post may contain affiliate links and I may earn a small commission when you click on the links at no additional cost to you. As an Amazon Affiliate, I earn from qualifying purchases. You can read my full disclaimer here.

Chanel and I created these flextangle templates for you to enjoy, so please do not copy, use, or redistribute our designs without our consent. We would love for you to share our templates,with our permission, or you can provide a link to our website where the templates can be accessed directly. Thank you and happy creating!
The Power of Zentangles
Using Zentangles is definitely a calming strategy that you can add to your child’s toolbox. But contrary to popular belief, zentangles are not just aimless doodles. Every line in a zentangle is placed deliberately and consciously.

Zentangles are based on a theory created by Rick Roberts and Maria Thomas. The process of making zentangles has become a popular patterning art form because of it’s calming and meditative effects. The word zentangle originates from the word “zen” meaning calm, and “tangle” meaning a collection of overlapping patterns [1]. With zentangles, there are no mistakes and no erasing. Every line made in error has the capability to be embedded into the pattern you are creating. There’s no pressure to create your patterns in a certain way; the process is completely open. There are many zentangle patterns available online but you can create your own by simply drawing a line or repeating a simple shape.
I have two free zentangle handouts available for you to download. You can choose to copy the patterns in the handout or use them to springboard into your own unique design. You can find a handout with easier patterns here and a handout with more challenging patterns here. Adding zentangles to your flextangle can take it to another level!
If you’re looking for more zentangle patterns to use in your flextangles, check out our zentangle tutorial series:
1. Zentangle Patterns for Beginners – Part 1
If you love zentangles as much as we do, you’re going to love our zentangle pyramid activity. Click HERE to check it out or click on the images below.


YouTube Video Tutorial - How to Make a Flextangle
Here’s our YouTube video that will show you step-by-step how to create a mesmerizing flextangle.
Prep time: 10 minutes
Children under 8 years old might require assistance assembling the flextangle.
For today’s art piece you’ll need:
- Flextangle Template printed on cardstock
- Zentangle patterns, if you are starting with a blank template
- Sharpie markers fine point/ultra fine point or any kind of colouring tool
- Ruler
- Scissors
- Cricut Scoring Tool or an old pen you can use for scoring
- Clear tape (optional)
- Tacky glue or any glue you have available
Step 1. Prepare Your Materials
Print your templates and get your workspace ready for something magical.

Step 2. Fill in Your Blank Flextangle template with Zentangle Patterns or a Colour Pattern
- I prefer to use sharpie markers to colour the flextangles because the results are more vibrant and striking. However, you can use whatever colouring tools you have available or you could also choose to leave your flextangle black and white.
- One of the blank flextangle templates that I’ve created for you has the letters A, B, C, and D (see below). You can follow the detailed guidelines on this template until you are familiar with the process.
- All of the triangular shapes in row A should have the same design. Pick a different design/colour for row B. Fill in all of the triangular shapes in row B, with that new design. Use a different pattern for rows C and D and repeat the same process.

Step 3. Cut Out Your Flextangle

Step 4. Score Every Line on Your Flextangle (Vertical and Diagonal)

Step 5. Fold Every Line on Your Flextangle (Vertical and Diagonal)
Folding all of the lines in your flexangle will make it easier to assemble during the gluing stage.

Step 6: Start Forming the Shape of Your Flextangle
Your folded flextangle should look like a long tube. If you’ve scored the lines, your flextangle should fold easily into place.

Step 7: Begin to Glue your Flextangle
- Apply a thin layer of tacky glue to one of the middle sections marked “Glue.”
- Fold this section over, placing the opposite pointed flap over the glued area. Carefully adjust the glued flap into position. I recommend that you hold this section together for about 1 minute to ensure that the section bonds.
- Once the glue has set in this section, gently flex/bend the section.
- Repeat this process for the remaining sections marked “Glue”.
- After gluing all of the sections marked “Glue”, gently bend all of the creases. This will allow your flextangle to to be more flexible. Let your flextangle set for a few more minutes before moving onto the next step.
- TIP – Allowing your sections to bond well with the glue will help your flextangle hold its shape when you start using it.

Step 8: Finish Gluing Your Flextangle
- Apply glue to both of the small “End Tabs” and carefully slide both tabs into the slit at the other end, closing the ring (you can also use a small piece of tape to connect the end tabs to the other side, in order to close the ring).
- Slowly start to bend this last joint, while you hold the ring together.

Step 9: Twist Your Flextangle
After the Flextangle has dried, it should be safe to twist. Slowly break it in, gently turning it in upon itself.


I hope that you have fun completing this activity! I’d love to hear from you – questions, comments, or any art activity that you’re looking for. Please also let me know how your flextangles turn out. Feel free to send me a picture of your beautiful creations to add to our gallery. You can send your pictures here. Thank you!
References
1. “Respect Zentangle.” Mrs. Cook’s Art Class, http://mrs-cook.weebly.com/respect-zentangle.html. Accessed 30 Jan. 2021.
9 thoughts on “Flextangles – Paper Toys (free printable templates)”
Pingback: DIY Sensory Bottles - Mindfulness Tool - Lightly Sketched
I need to say, you are an amazing article.
Thank you! I appreciate your feedback.
These are super cool! I love learning about new ways to get creative!
Thank you! Glad you like them.
Wow! Your posts are so creative and detailed. I love some of the ideas. I’m not very crafty but the look simple enough for any Mom.
Thank you! Many of them are easier than they look. Please let me know if you decide to try any of them.
I remember making these when I was a kid. This brought me back to my childhood, haha. Such a cool post and love how creative yours are 🙂
Thank you! That’s awesome. Thanks for sharing!
Comments are closed.