"Art is a journey that opens the heart and mind to infinite possibilities."
Unknown Tweet
Table of Contents

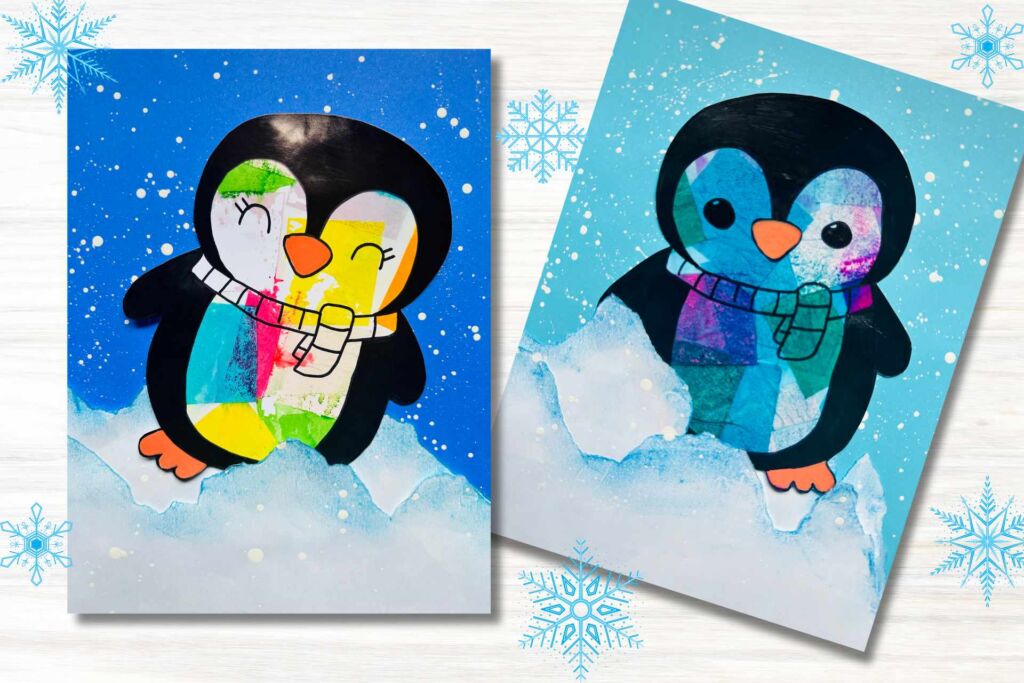
Chill Out With This Adorable Penguin Craft
Looking for an activity that will ignite your creativity and bring some joyful charm into your day? Look no further! Our easy-to-follow penguin craft tutorial will take you on a delightful journey into a wintery wonderland. With a few fun materials and some simple techniques, you’ll be able to create your very own playful penguin in the snow that is bound to bring a smile to your face.
Winter is the perfect time for penguin crafts. When the chilly weather keeps us indoors, there’s nothing better than cozying up with a fun and creative activity. This Penguin craft not only captures the whimsy and wonder of these adorable creatures but also allows you to express your creativity and imagination.
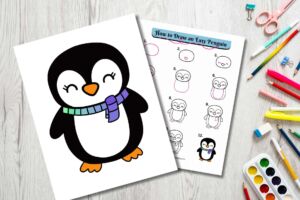
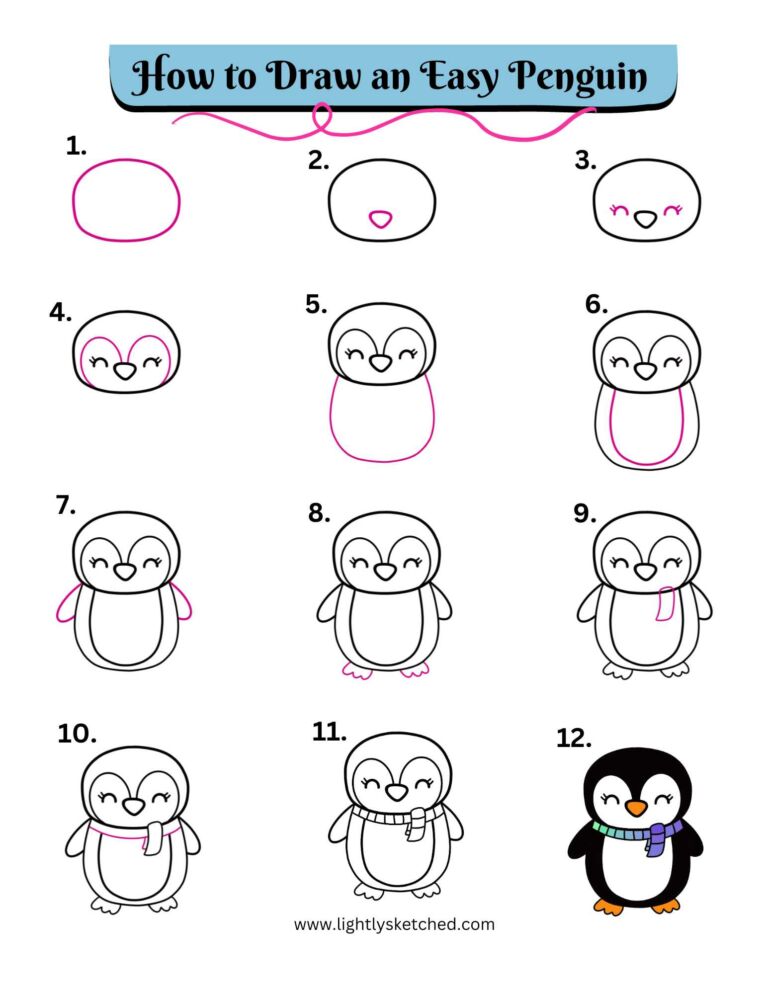
The penguin that we drew for this penguin craft can be found in our step-by-step drawing tutorial. You can download the free PDF HERE or check out this blog post for more detailed instructions.

This post may contain affiliate links and I may earn a small commission when you click on the links at no additional cost to you. As an Amazon Affiliate, I earn from qualifying purchases. You can read my full disclaimer here.
How to Create an Easy Penguin Craft
The Magic of Bleeding Tissue Paper
This penguin craft is really special because it combines a variety of art materials in a new way. This craft incorporates high gloss photo paper and bleeding tissue paper. The bleeding tissue paper is used to create the penguins in this craft and the results are vibrant and dynamic.
Using bleeding tissue paper is a fantastic way to bring your penguins to life! This unique paper has special properties that allow the colors to bleed and blend together when wet, creating a stunning effect. With just a few simple steps, you can create eye-catching paper, which you’ll use to create your magical penguins.
Furthermore, using bleeding tissue paper allows for endless possibilities when it comes to color combinations. You can experiment with different hues and shades, creating a customized and vibrant penguin. Whether you prefer a wintry palette of blues and whites or a more vivid and playful mix of colors, the bleeding tissue paper technique gives you the freedom to express your creativity and make your penguin truly unique.

Photo Paper is an Extraordinary Canvas
Drawing on Photo paper is a blast! I discovered the magical nature of this art medium a few years ago when I was dabbling with some materials I found in one of the cupboards of my art room. Since then, I’ve experimented with different ways to use photo paper with kids and I’ve incorporated 2 of our favorite ways in this craft – with markers and bleeding tissue paper.
The high gloss finish of the photo paper adds an extra oomph to your creations, making colors pop and line shine. It’s like giving your artwork a sleek, polished vibe. Sharpies and other pens are like the superheroes of this paper – they work like a charm, effortlessly gliding across the surface while retaining that glossy allure. When I complete this craft with kids, we’re always asked how we made the penguins so shiny. The secret is high gloss photo paper!
Bleeding tissue paper is another material that can take your photo paper to another level. The magic happens as the tissue’s vibrant hues effortlessly mingle with the glossy canvas, creating a mesmerizing effect. The best part? The photo paper doesn’t lose its shine; it absorbs the bleeding tissue’s pigments, creating a lustrous masterpiece.
Here are a few other activities that you’re going to love:


Our new Zentangle course is here!
Are you trying to find ways to incorporate self-care and creativity into your life? Would you like to introduce the Zentangle Method to your children or students but you’re not sure how?
If you answered yes to any of these questions then you’re going to love our new course. If you haven’t had a chance yet to watch the course overview video, check it out below!
So, let’s dive into this penguin craft. I’m confident that you’ll be very happy with the results! Have fun 🙂
Step by Step Tutorial
Appropriate for Children Ages 6 and up
Difficulty: Easy
Total Time: 2 X40 minute blocks
Materials:
- Penguin Drawing Guide (Optional)
- Black Micron Pens for drawing your penguin, or Sharpie Markers
- White Glossy Photo Paper (8 1/2″ X 11″)
- Bleeding Tissue Paper
- Pencil and eraser for drawing
- Orange Posca paint pen or orange acrylic paint
- Paintbrushes and water
- Scissors
- Glue stick
- 1 piece of blank paper for the snow (8 1/2″ X 11″)
- Chalk Pastels
- Blue Colored paper or cardstock for the background
- White paint for splattering the snow (optional)
Instructions:
Step 1 – Prepare your bleeding tissue paper
After you’ve gathered your materials, choose a few pieces of bleeding tissue paper that you’d like to use for your penguin. You can choose light pastel colors, cool colors or any color combination that you’d like.
Cut your bleeding tissue paper into strips and then into squares. You can experiment with different sizes.


Step 2 – Wet your photo paper
Dip your paintbrush into water and apply a thin layer of water to a section of your photo paper.

Step 3 - Apply your bleeding tissue paper
Place a few pieces of bleeding tissue paper onto the wet sections of your photo paper. Once you’re satisfied with the placement of the tissue paper, lightly apply water to your bleeding tissue paper with your paintbrush.
The water will activate the paper’s bleeding properties, causing the colors to spread and blend together. Be careful not to oversaturate the tissue paper; a thin layer of water is usually enough.


Below is another color combination that we tried for today’s penguin craft. You can choose any colors that you’d like!

Step 4 - Let dry

Step 5 – Remove the dry tissue paper
The tissue paper will become lighter once it’s dry. Gently peel the tissue paper off the photo paper and discard.
As you remove the tissue paper, you’ll reveal a beautiful and unexpected pattern that perfectly complements your penguin’s adorable shape. This technique adds a touch of artistry and sophistication to your craft, making it truly special.


Step 6 – Draw your penguin
Draw a penguin on your beautiful photo paper. You can lightly draw your penguin in pencil first and then outline it with a black sharpie marker. Download our free penguin drawing guide or check out this blog post to follow along with our step by step drawing tutorial.


Step 7 – Color the black sections of your penguin with a black marker

Step 8 - Color the nose and feet
Using an orange Posca marker or acrylic paint, color in your penguin’s nose and feet.


Step 9 – Cut out your penguins

Step 10 – Start creating your background
You’ll need your blue background paper and your white piece of paper for this next step.
Take your white piece of paper and tear it along the bottom to create snowy hills. You can rip several pieces of white paper to create layers.


Step 11 - Shade your snow hills
Using your blue pastels, gently color the tops of your snowy hills and blend it using your finger.


Step 12 - Glue your hills to your background
If you don’t add glue to the tops of your snow hills, you can tuck your penguin between them. So you can glue the bottoms of your snow hills and leave the tops unglued to create depth and dimension.

Step 13 - Create a snowy background with white paint (optional)
You’ll want to cover your work space with plastic or protective sheets because this next step can get messy lol.
Pour some white paint into a paint tray and add a bit of water to make it thinner. Dip your brush into the white paint and splatter some paint onto your background. You can also pour your diluted paint into a spray bottle and spray it onto your page.


Step 14 - Glue your penguin onto your background
Tuck your penguin in between your snow hills and glue your penguin to your background.

Creating your own playful penguins is an enjoyable craft activity that can be enjoyed by all ages. This easy step-by-step tutorial has shown us the wonders of using bleeding tissue paper and photo paper to bring these adorable creatures to life.
So, gather your materials and let your creativity soar as you embark on this delightful penguin crafting journey. As the saying goes, “Creativity is contagious, pass it on.” Start crafting today and discover the magic of this penguin craft.
If you draw this easy penguin with your kids or students, please let me know! I’d love to add your creations to our gallery, so upload your photos or send them directly to me at: [email protected] Thank you!
You can also tag us if you post your masterpieces on Instagram or Facebook.

Looking for even more cool activities? You might be interested in our Zentangle Penguin Coloring Pages. Click HERE or on the image below to learn more.

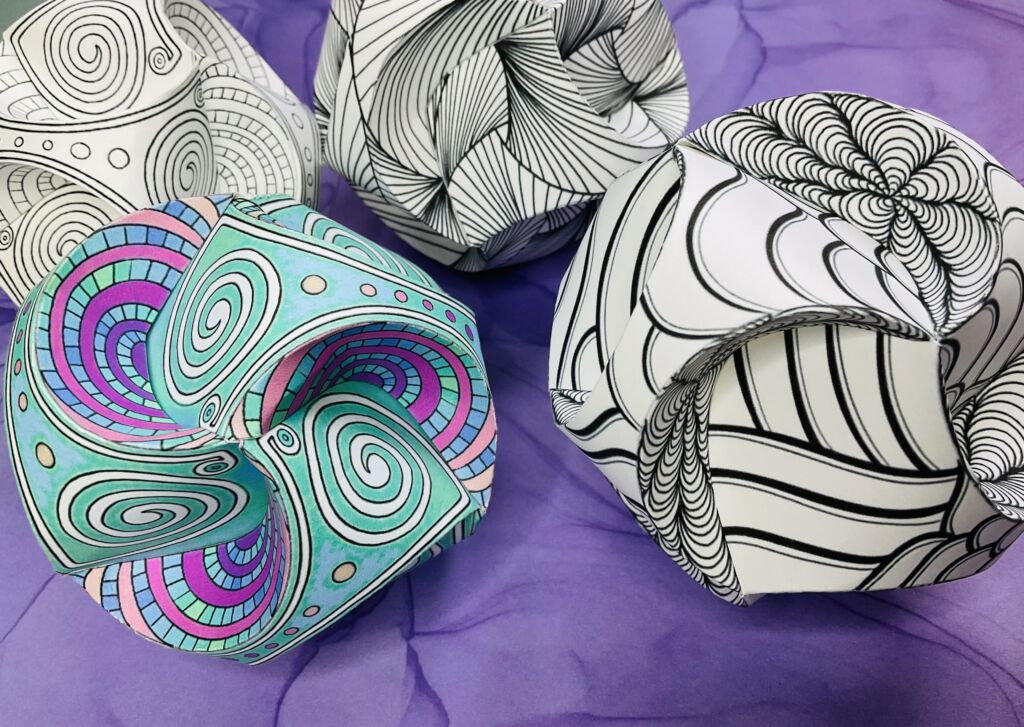
If you love zentangles as much as we do, you’re going to love our zentangle pyramid activity. Click HERE to check it out or click on the images below.

Final Thoughts
If you’re looking for more activities designed to encourage mindfulness and spark creativity, check out my printable resources below or visit my shop!


Don’t forget to download our free 15 page Mindfulness coloring book to help add a few mindful moments to your child’s day. Just click here or the image below!
